Building AI Chat Workflows with FlowiseAI and DeepSeek R1
Building intelligent chat workflows has never been easier, thanks to tools like FlowiseAI and DeepSeek R1. By using FlowiseAI's visual automation platform and DeepSeek R1's advanced AI capabilities, you can create workflows that provide meaningful and contextual responses to user queries. In this blog, we’ll walk you through the process of integrating DeepSeek R1 into a FlowiseAI workflow.
Configuring DeepSeek
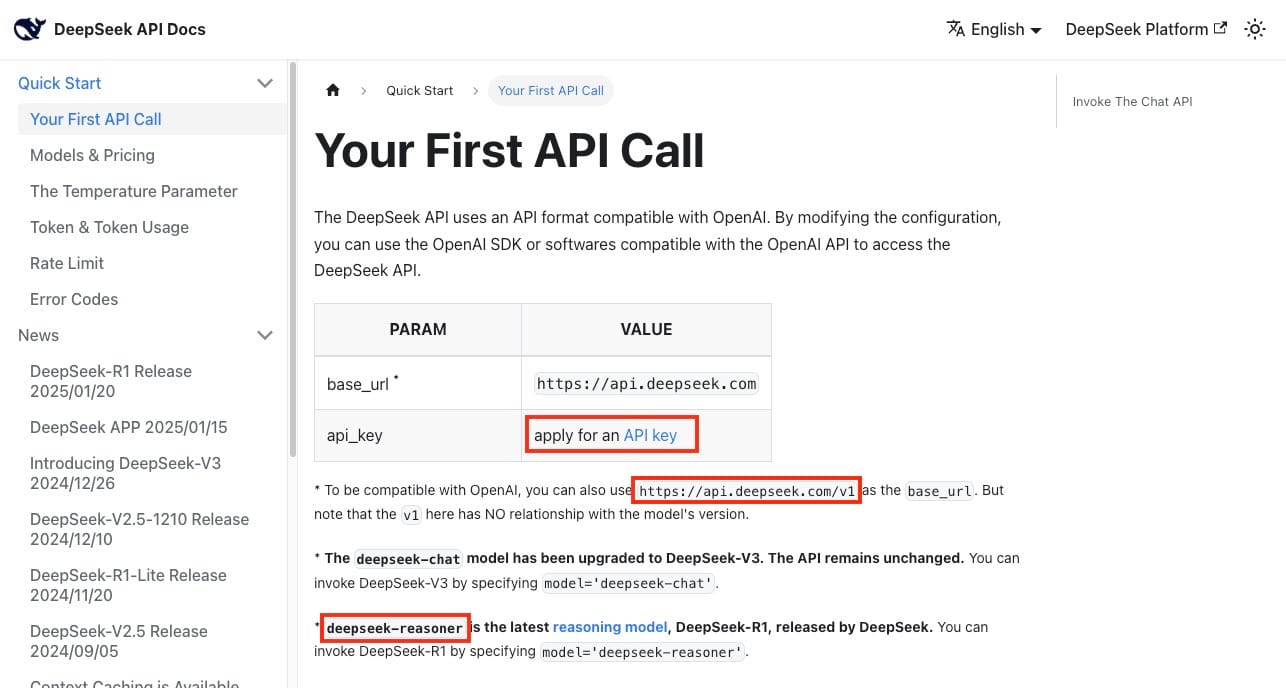
The workflow begins with the ChatDeepSeek node, which is responsible for receiving incoming messages from a connected chat platform. To access the required information to setup, we will head over to DeepSeek API Documentation and grab the following information as shown in the image.
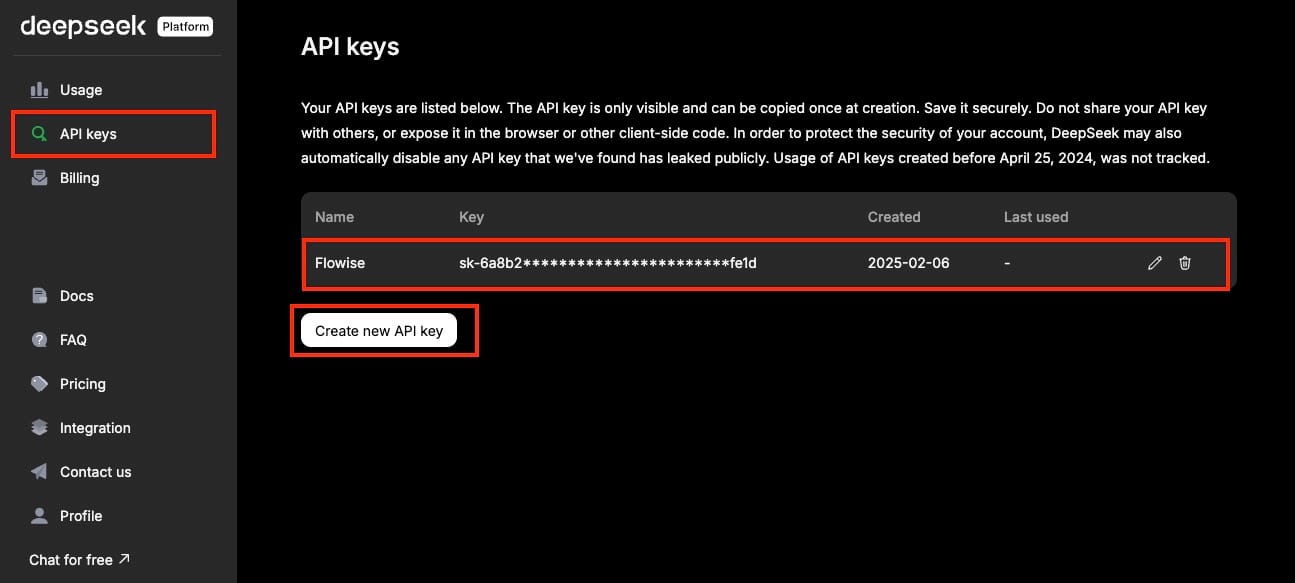
Next head over to the link provided on the docs page for API Key or just head over to https://platform.deepseek.com/api_keys and generate a new key and copy it somewhere safely.
To start, you’ll need to add the ChatDeepSeek node to your FlowiseAI workflow. ChatDeepSeek node acts as the entry point, capturing real-time user input and triggering the subsequent flow in the workflow. To configure it, simply click the + icon in the FlowiseAI node canvas and select ChatDeepseek.
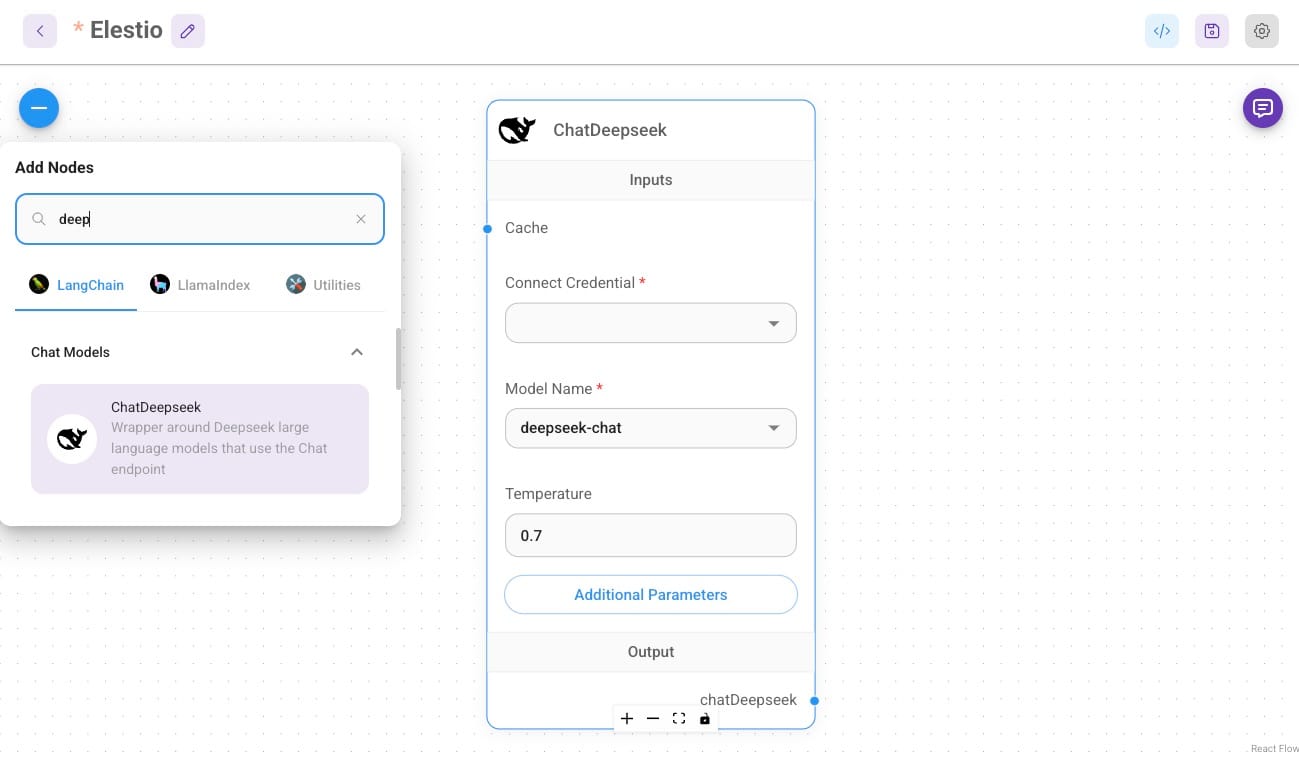
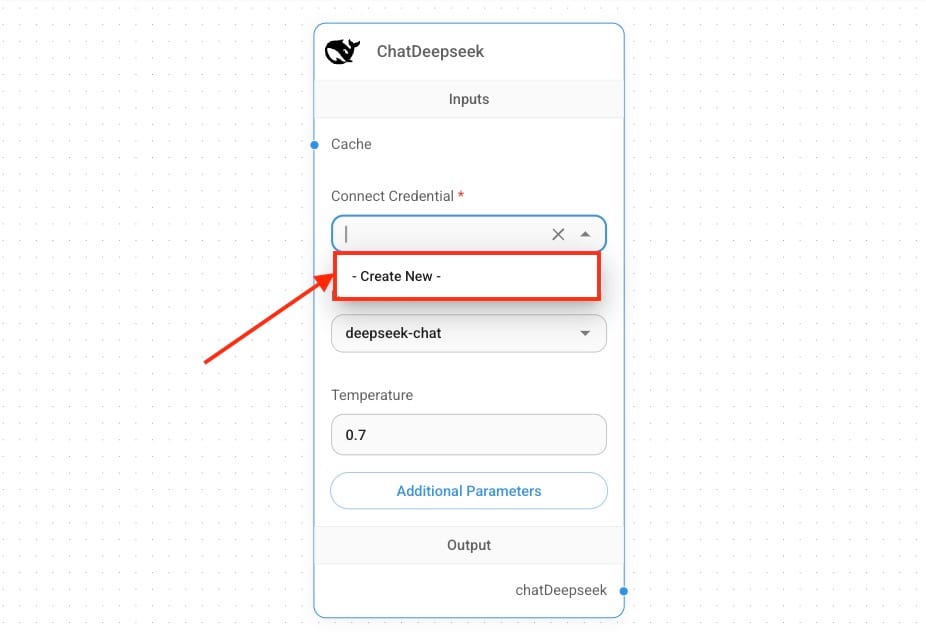
The node does not require any complex configuration so we will configure the credentials and model selection. First, click on Connect Credentials and click on the Create New button.
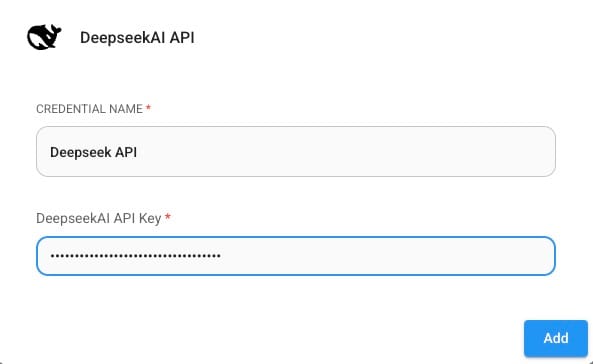
Now add the API credentials taken from the DeepSeek platform and add them here. Once entered, click on Add and head over to the next configuration.
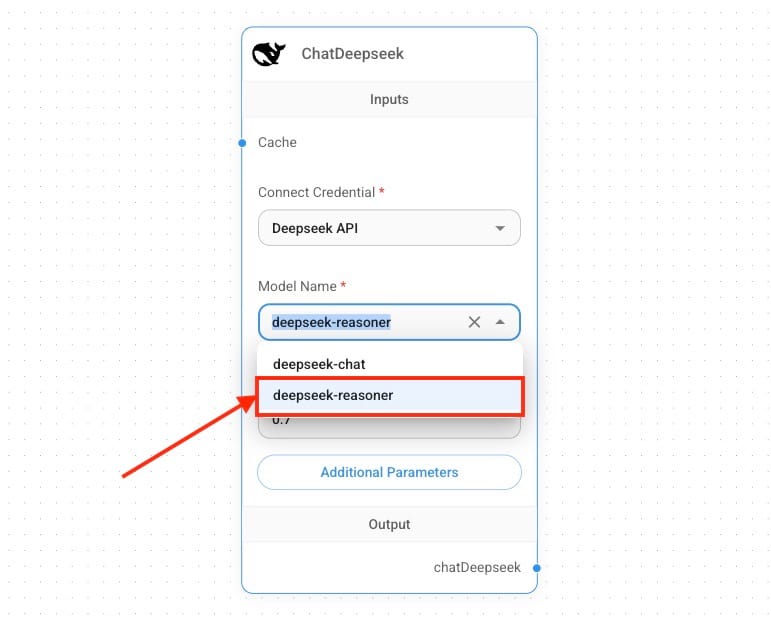
Next, we will select deepseek-reasoner as a model name. The DeepSeek Reasoner Model is designed for logical reasoning, problem-solving, and data-driven decision-making, making it ideal for structured tasks. In contrast, the DeepSeek Chat Model excels at natural language understanding and generating human-like responses, making it perfect for conversational interfaces and chatbots. Let's keep the temperature to 0.7 you can configure and tweak it according to your needs.
Setting Up Buffer Window Memory
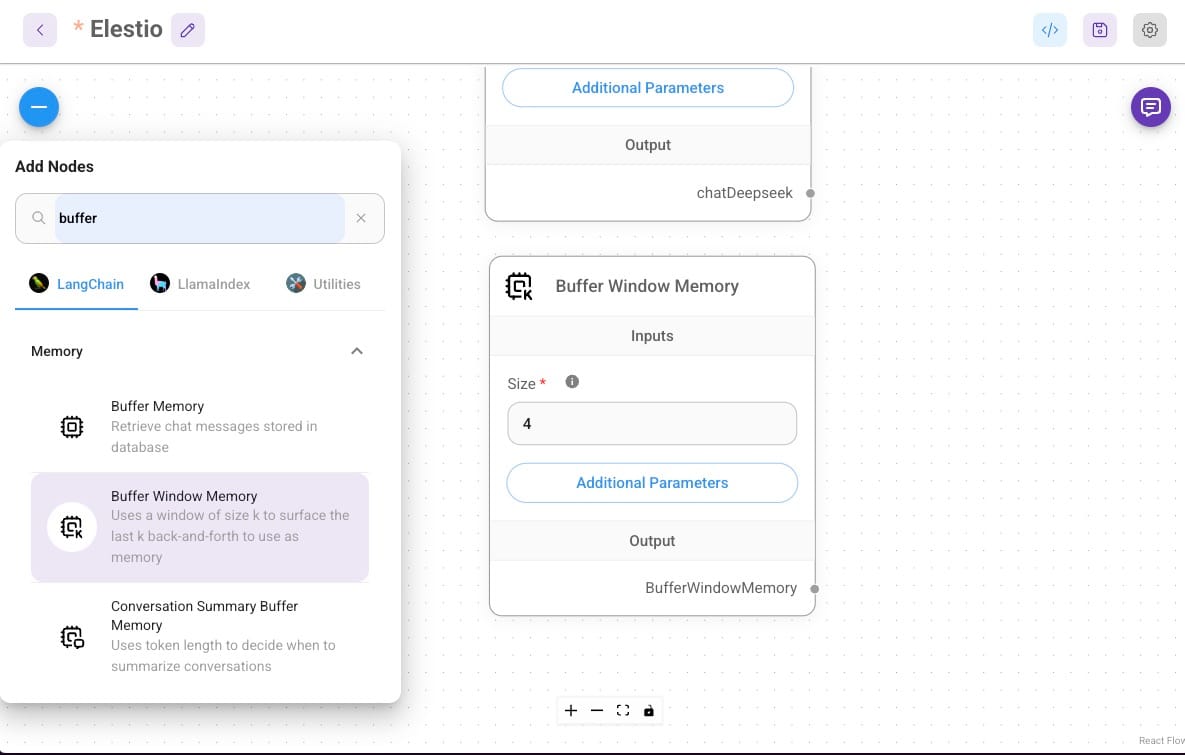
To ensure that the Conversational Agent can maintain coherent and context-aware conversations, you will need to add the Buffer Window Memory node. This node stores a history of past interactions, allowing the system to reference previous messages for continuity in ongoing conversations.
To add the Buffer Window Memory node, click the + icon and search for Buffer Window Memory. Once added to the workflow, configure the node by specifying the buffer size, which determines how many past messages the memory will retain. The default value is set to 4, but you can adjust this based on how much context you want the system to store. Increasing the buffer size can allow the AI to handle more complex and extended conversations. No additional configuration is necessary unless you want to change the default memory settings. This memory system enables the Conversational Agent to refer back to previous messages, ensuring that the AI responds intelligently by maintaining an understanding of the conversation’s history.
Setting Up Conversational Agent
Once the chat message is captured by the ChatDeepSeek node, it is passed on to the Conversational Agent node for processing. The Conversational Agent node is the central component where DeepSeek R1’s AI comes into play. This node processes the user input, applies natural language understanding, and generates a relevant, meaningful response.
To configure the Conversational Agent node, add it to the canvas by clicking the + icon again and selecting Conversational Agent. Proceed by connecting the DeepSeek node to the Chat Model endpoint and Buffer Window Memory to the Memory endpoint.

Adjust any other settings as required, such as response length or the inclusion of specific tools that the AI can use to enhance its responses. Once configured, the Conversational Agent will use DeepSeek’s AI capabilities to process incoming messages and generate contextually accurate replies.
Creating the Chat Interface
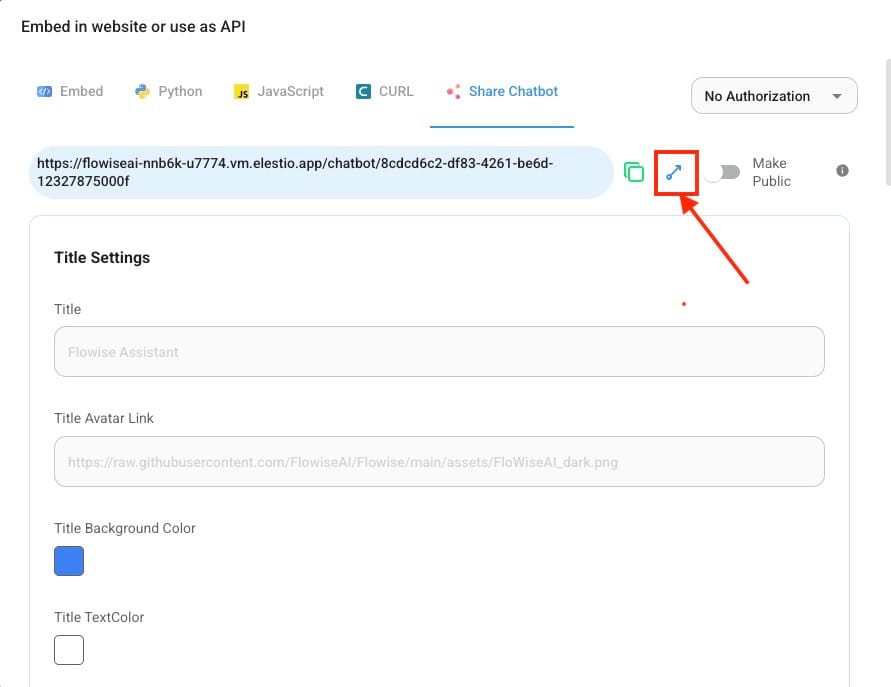
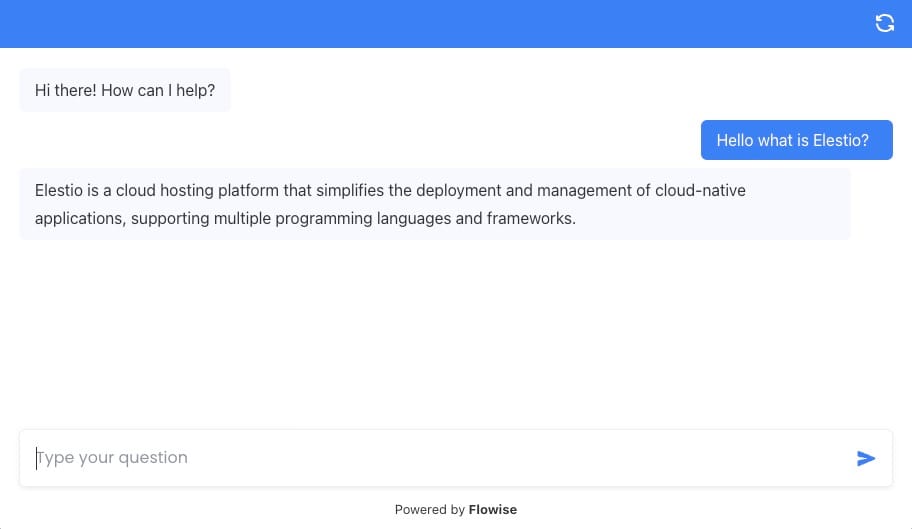
FlowiseAI enables you to customize the appearance and behaviour of the chat interface to match your application’s needs. You can adjust the layout, colour scheme, and user experience settings to ensure it aligns with your branding. Once set up, the chat interface will provide users with a seamless experience where they can send messages, and the Conversational Agent will generate and send back intelligent responses. You can view the live preview by heading over to the Share Chatbot window and clicking on the arrow icon.
Testing the Workflow
Now that the workflow is set up with all necessary nodes—ChatDeepSeek, Conversational Agent, and Buffer Window Memory—it’s time to test the entire system. Now try to communicate with your newly built AI chatbot workflow through a live preview link and then you can proceed to deploy it for public use, embedding and integrating. Ensure that the message is successfully processed by the Conversational Agent, which should generate a response based on the input.
Thanks for Reading ❤️
Thanks for reading! We hope this detailed guide helped you understand how to integrate DeepSeek R1 into a FlowiseAI workflow to create intelligent, context-aware chat systems. Don’t forget to explore the official documentation for both FlowiseAI and DeepSeek R1 to unlock their full potential and experiment with advanced features. Start building your workflows today and see how AI can elevate your automation projects. See you in the next one! 👋