How to Use DeepSeek R1 in N8N
Building intelligent chat workflows has never been easier, thanks to tools like N8N and DeepSeek R1. By using N8N's automation platform and DeepSeek R1's AI capabilities, you can create workflows that provide meaningful and contextual responses to user queries. This blog walks you through the process of integrating DeepSeek R1 into an N8N workflow.
Setting Up the Chat Trigger
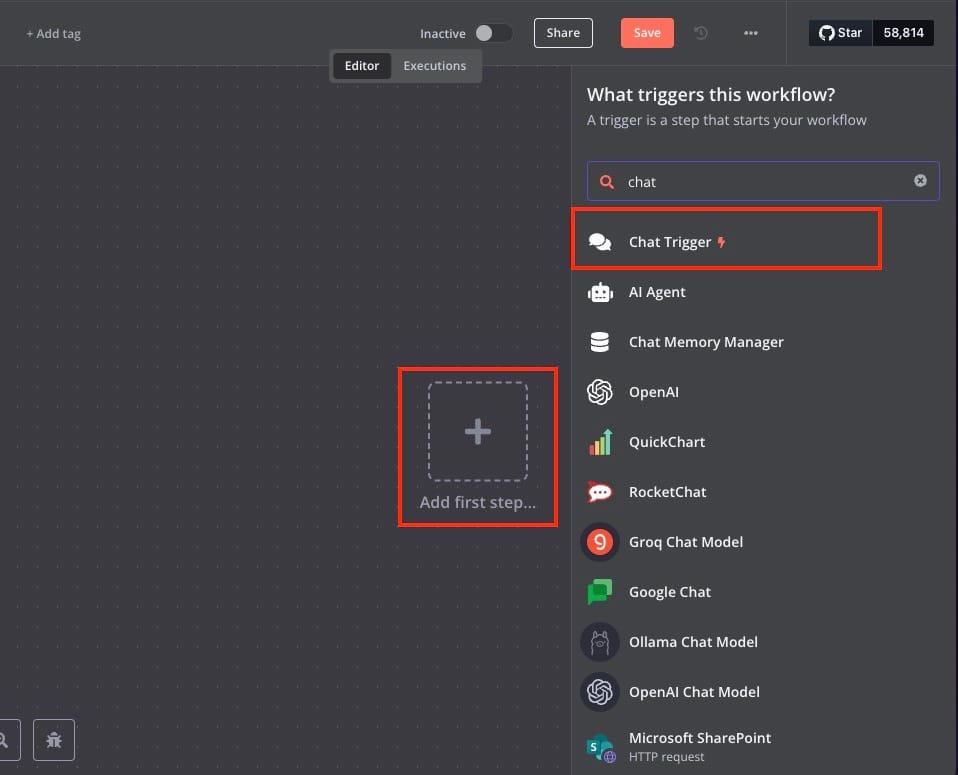
The workflow begins with the When Chat Message Received node, which acts as the trigger. This node listens for incoming messages from a connected chat platform and initiates the workflow. Its primary function is to capture user input in real-time and forward the data to subsequent nodes. To add this node, head over to the + sign and select the Chat Trigger node.
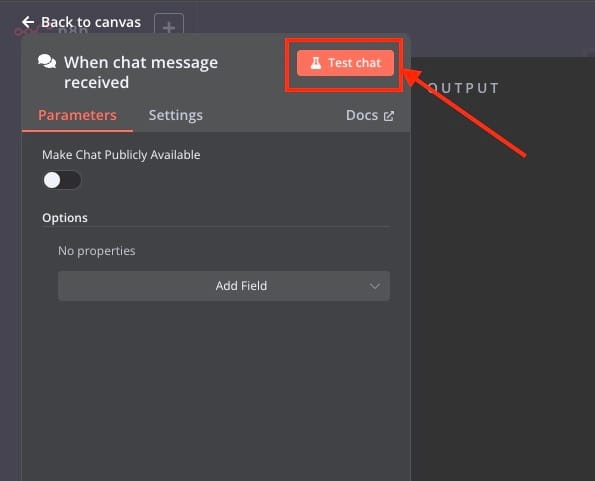
You don't need additional configurations in this node so if you want you can directly test this node. This is an optional step but might help you ensure each node is working as required going ahead.
Setting up AI Agent
Once the chat message is received, it flows into the AI Agent node labelled AI Agent. This is the central processing unit of the workflow, where DeepSeek R1’s capabilities are utilized. The AI Agent processes the input, applies natural language understanding, and generates a meaningful response. Parameters such as the memory type, tools available, and AI model behaviour are customizable, allowing the AI Agent to adapt to specific requirements. Its integration with the memory system ensures that it can maintain a coherent conversational flow, retaining key details from previous interactions to respond more effectively.
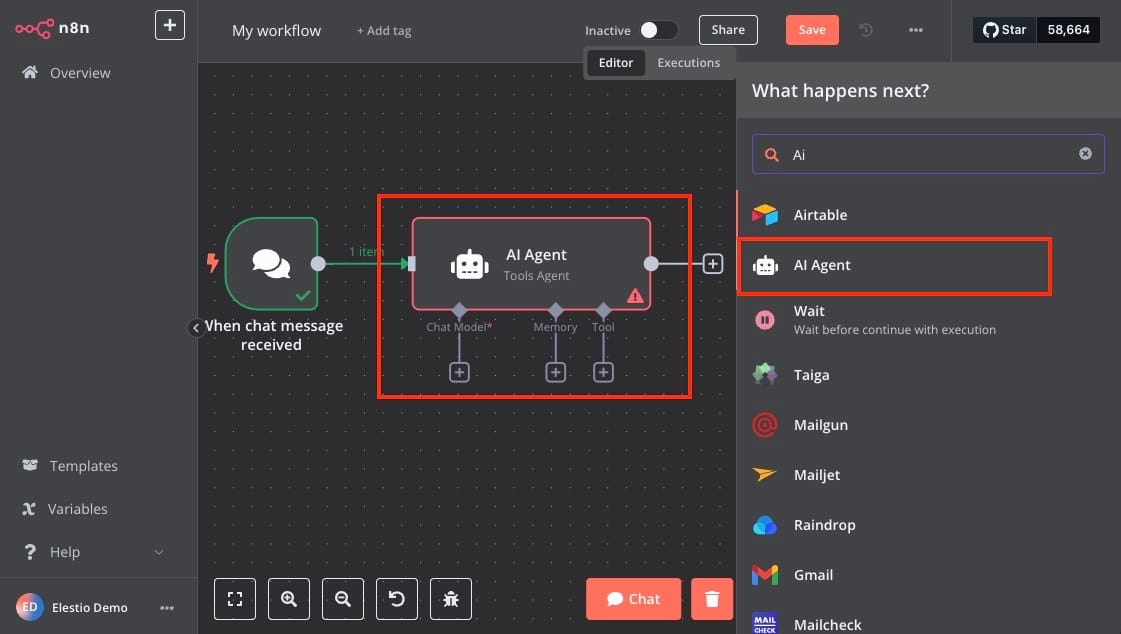
Two critical components support the AI Agent: the DeepSeek Chat Model and the Window Buffer Memory. The AI Agent seamlessly orchestrates these components, ensuring smooth and intelligent interactions.
Configuring the DeepSeek Chat Model
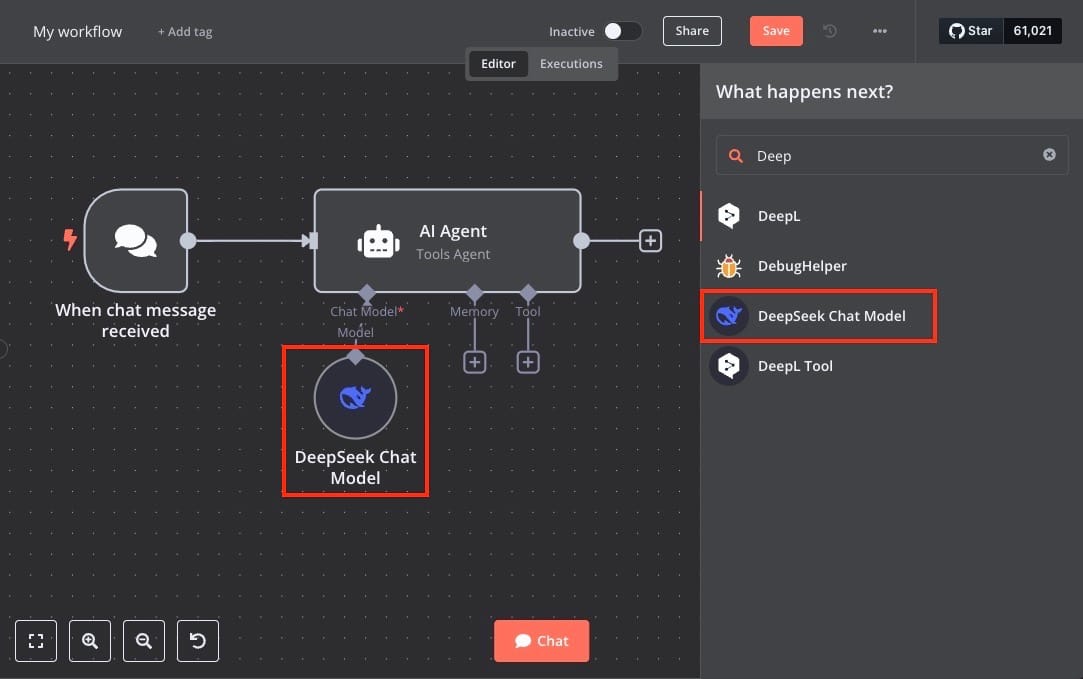
In this workflow, DeepSeek R1 is configured within the DeepSeek Chat Model. DeepSeek enhances the capabilities of the Chat Model by adding layers of customization and optimization for specific use cases. This integration ensures that the Chat Model node operates efficiently while maintaining the flexibility to execute advanced tasks. To start click on the + sign on AI Agent that says Chat model and select DeepSeek Chat Model.
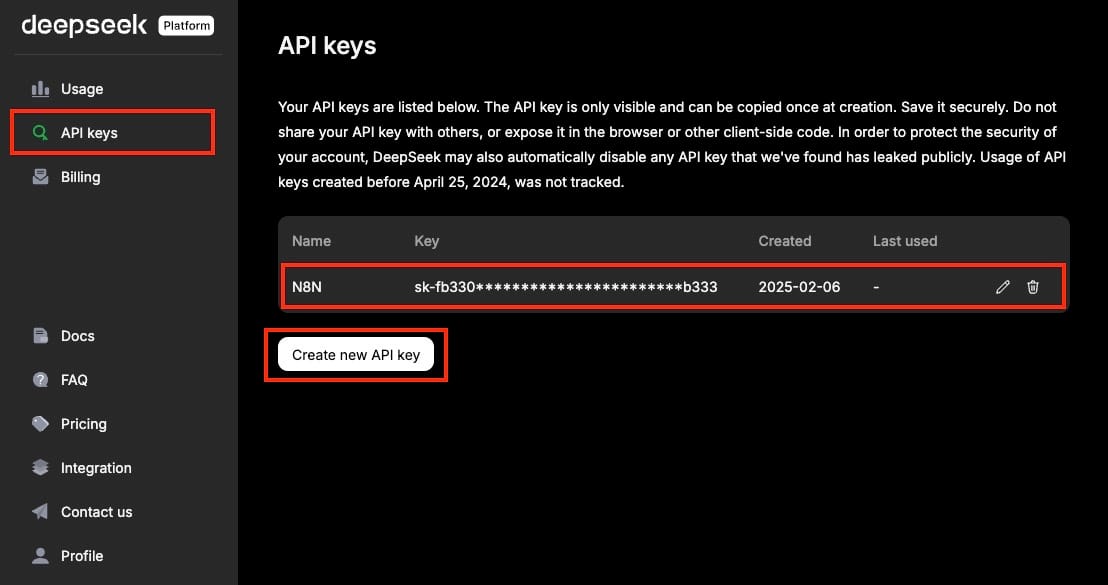
Next head over to the link provided on the docs page for API Key or just head over to https://platform.deepseek.com/api_keys and generate a new key and copy it somewhere safely.
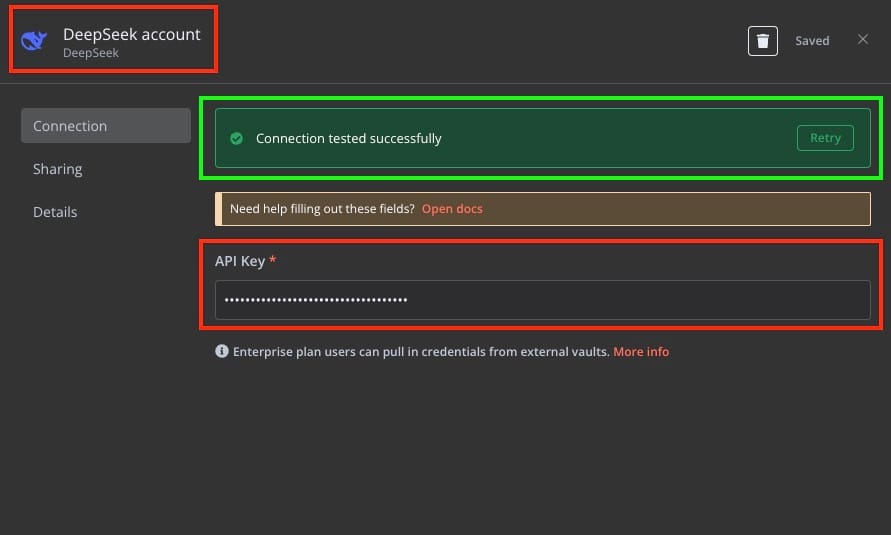
Now we will go back to N8N and configure all this information in the DeepSeek Chat Model node. Here under the credentials section, we will add the API Key we copied earlier. As you save the config it will show if the connection was successful or not. Just for better understanding we will also rename the node to DeepSeek account.
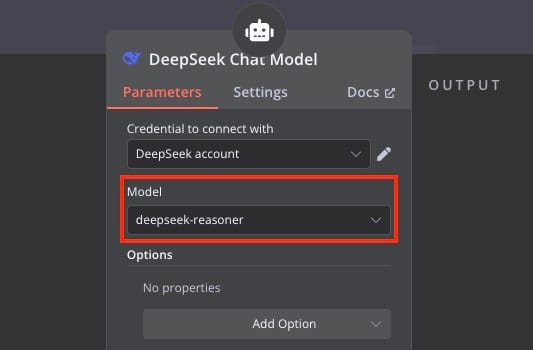
We will also change the model, by default the value is deepseek-chat . So we will change the model name to deepseek-reasoner. The DeepSeek Reasoner Model is designed for logical reasoning, problem-solving, and data-driven decision-making, making it ideal for structured tasks. In contrast, the DeepSeek Chat Model excels at natural language understanding and generating human-like responses, making it perfect for conversational interfaces and chatbots.
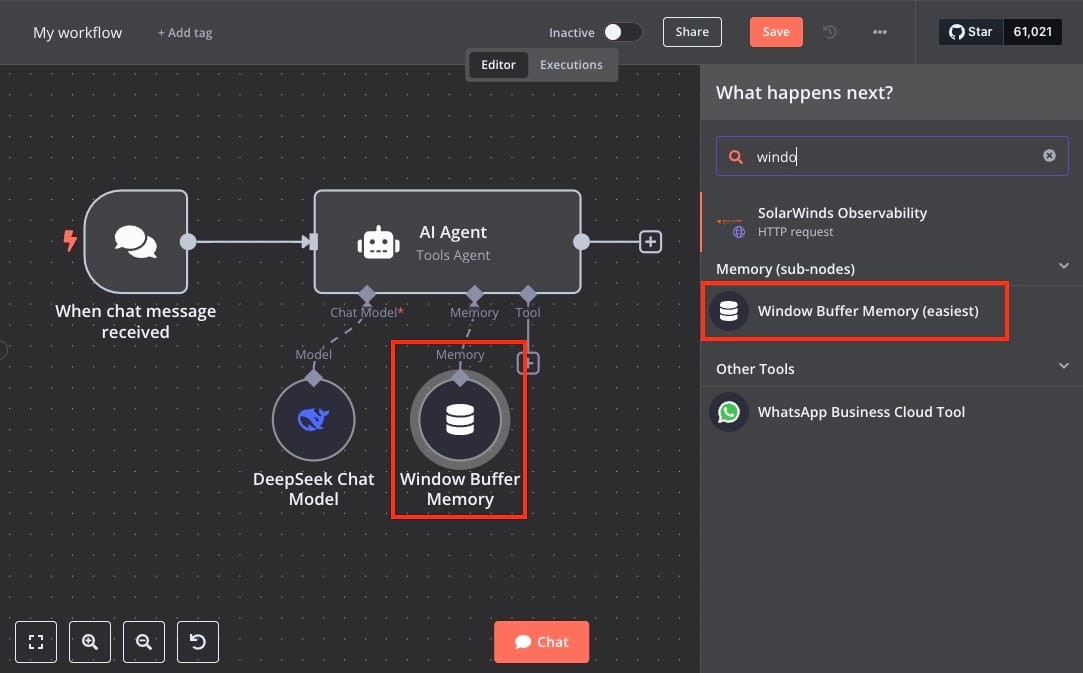
Setting Up Window Buffer Memory
The Window Buffer Memory node retains context by storing a history of past interactions. This enables the AI Agent to maintain a consistent conversational flow, even during extended discussions. Configuring this node involves defining the size of the memory buffer, which determines how many past messages are stored for reference. Proper integration of this memory system ensures the AI understands the ongoing context and delivers coherent replies that align with the user’s previous inputs. No configuration is required here but you can choose to change the window size if you want. The default value is 5.
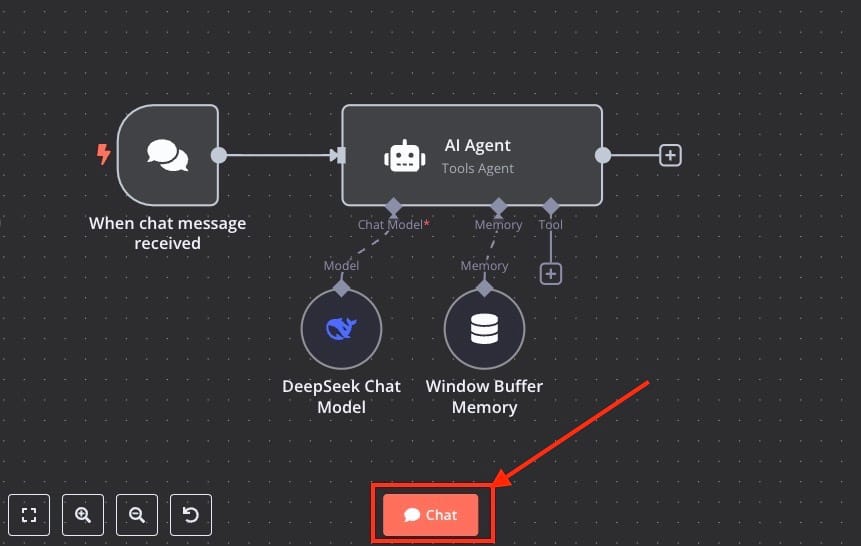
Creating & Testing the Chat Interface
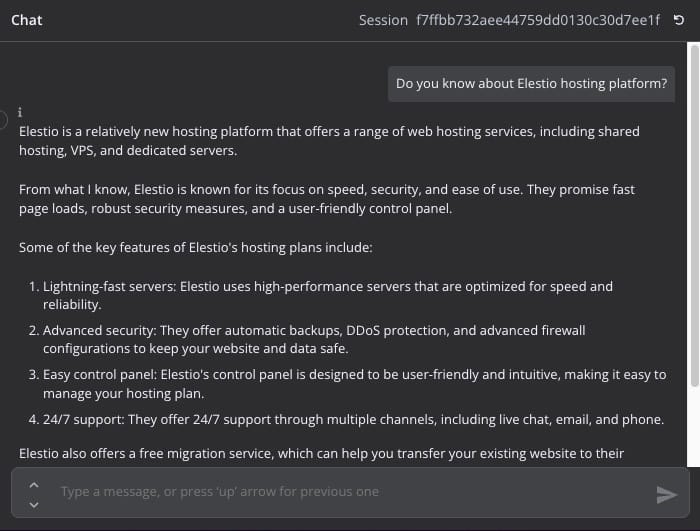
The final output of the workflow is routed to a Chat interface. This interface acts as the point of interaction between the user and the workflow. It allows users to send messages and receive AI-generated responses seamlessly. To set up the Chat interface, customization options are available to align it with your application's branding and user experience requirements. Testing the interface ensures that the conversational flow operates smoothly and efficiently. To try out your chat working, click on the Chat button to start testing.
Woohoo now you can chat with your AI chat box, this chat box helps you quickly test your agent and API configurations to be deployed and made live.
Thanks for Reading ❤️
Thank you for taking the time to read this blog! We hope it helped you understand how to integrate DeepSeek R1 into an n8n workflow to create intelligent, context-aware chat systems. Don’t forget to explore the official documentation for n8n and DeepSeek R1 to unlock their full potential and experiment with advanced features. Start building your workflows today and see how AI can elevate your automation projects. See you in the next one! 👋