No Code MCP Setup with N8N
This guide walks through the complete process of setting up MCP (Managed Community Plugin) community nodes inside a self-hosted instance of n8n. It covers how to deploy n8n using Elestio, how to connect to open MCP servers like Airbnb and Brave Search, and how to create a fully functional AI-powered workflow that dynamically selects and executes tools based on user input all without writing terminal commands.
Hosting & Setting up
We begin by self-hosting n8n on Elestio. Once logged into Elestio, you can search for the n8n service and deploy it using a cloud provider like Hetzner or any other of your choice. It’s recommended to start with at least the medium-sized plan because MCP-based workflows can be memory-intensive.
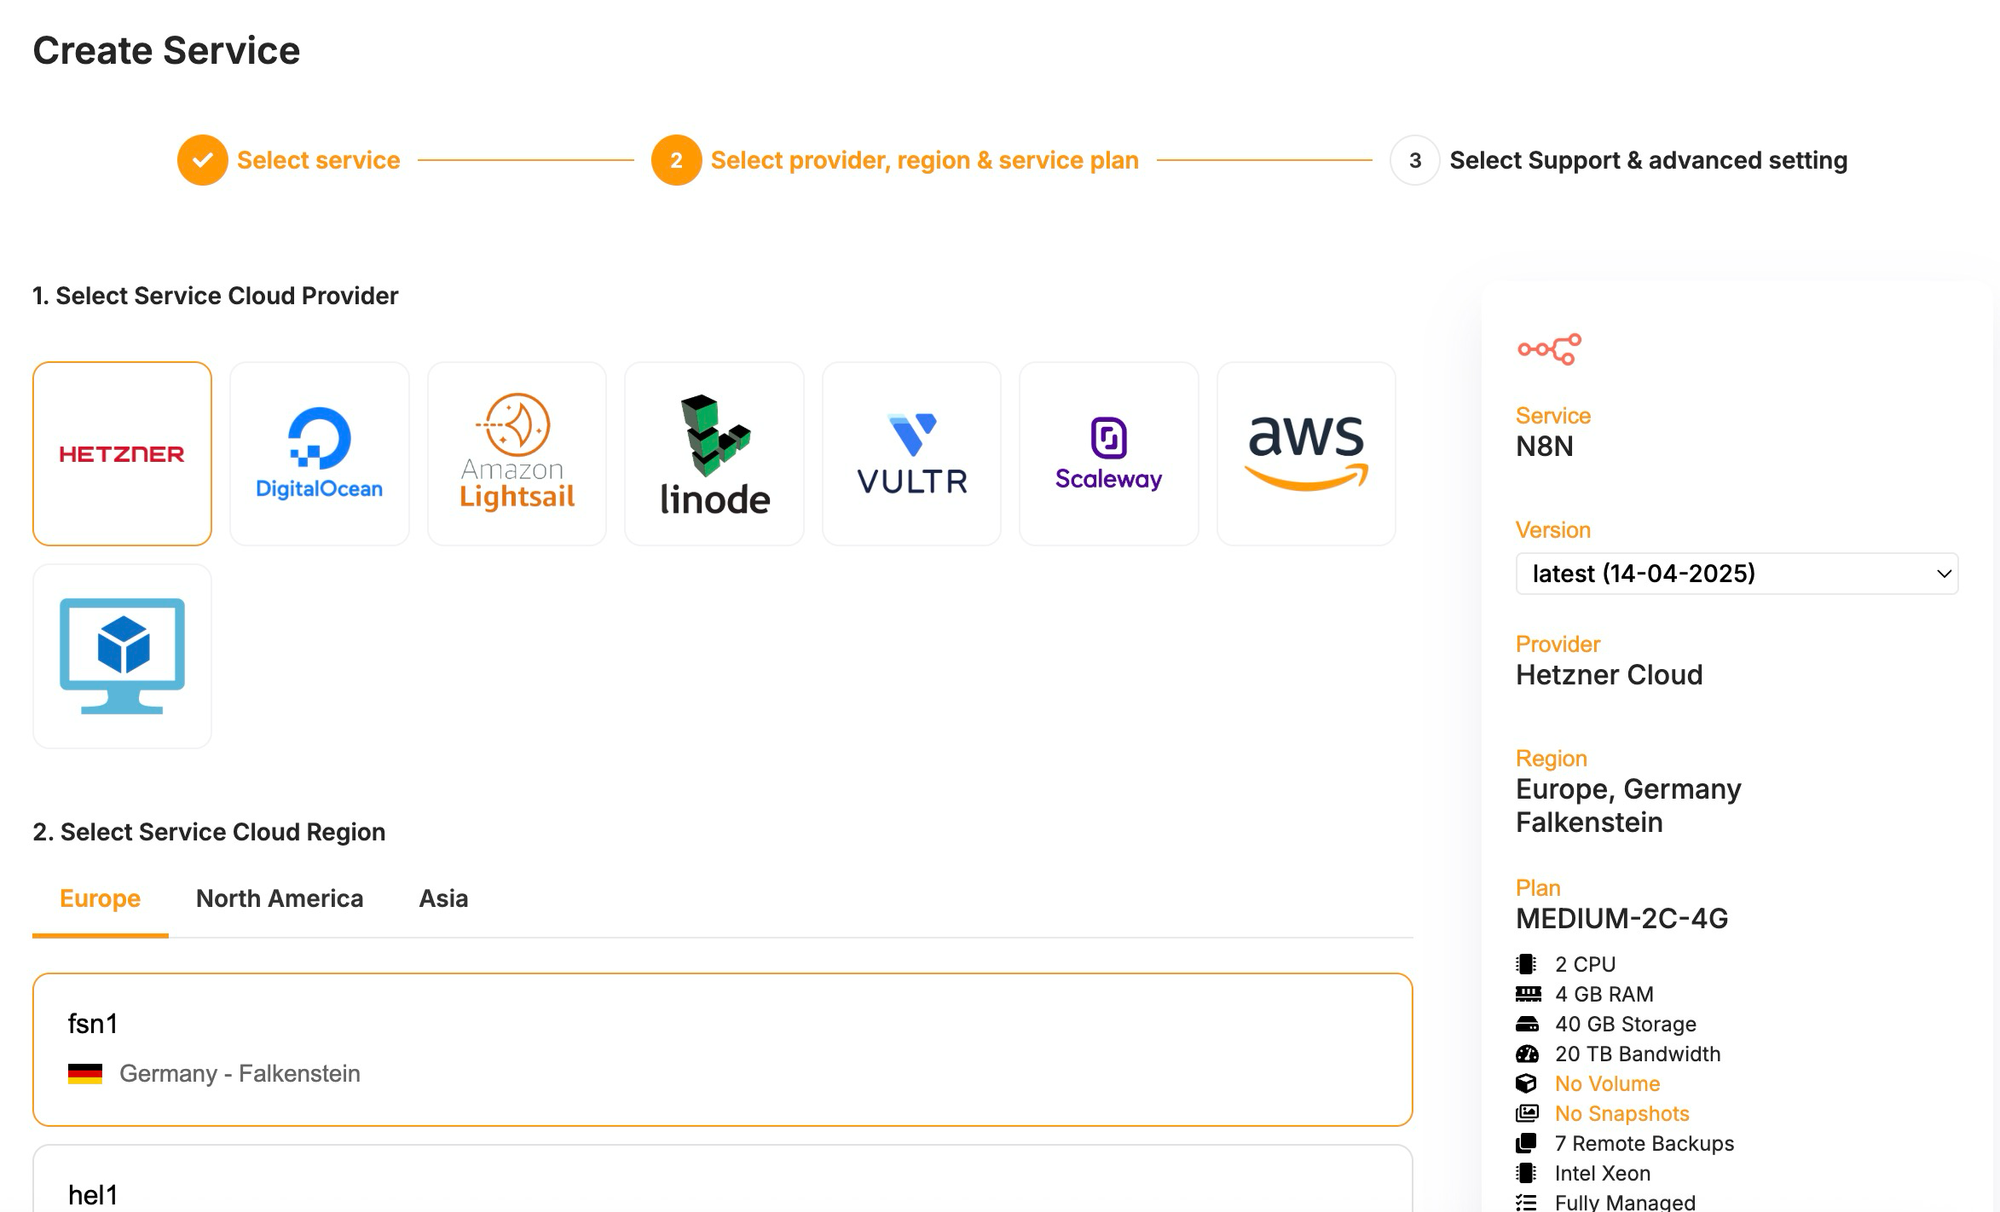
During the deployment process, you define a subdomain like n8n-demo, and once the service is live, you complete the n8n setup by visiting the domain.
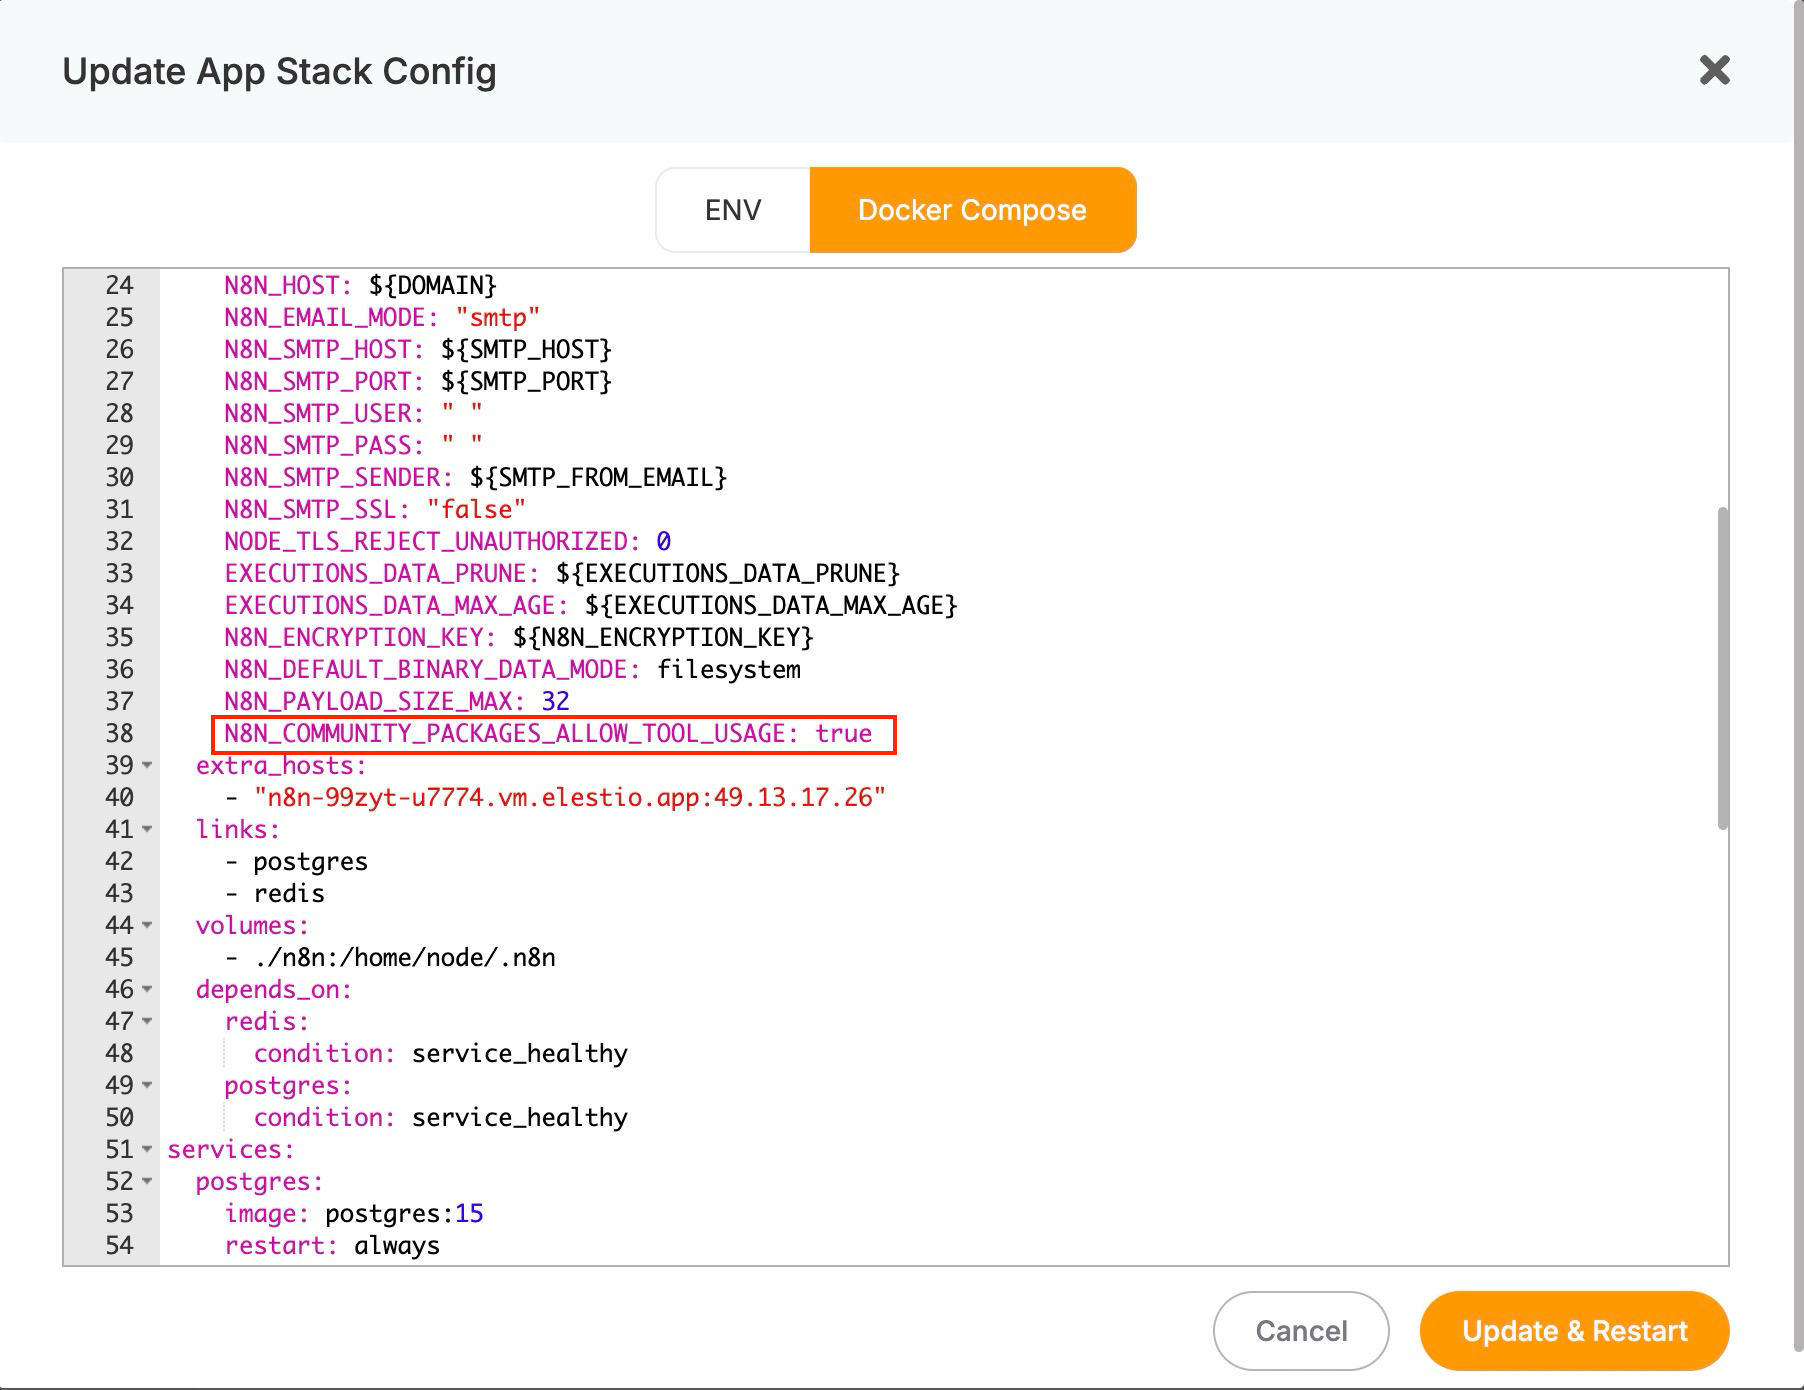
Before building workflows that utilise MCP tools, it is critical to enable community packages by setting the following environment variable:
N8N_COMMUNITY_PACKAGES_ALLOW_TOOL_USAGE: trueThis setting allows AI agents inside n8n to execute custom tool operations.
Installing MCP Community Nodes in n8n
MCP stands for Model Context Protocol, a standard that allows AI agents or workflows to interact with external tools via a lightweight, composable interface. These tools are usually hosted as independent services and can be used for web scraping, search, data extraction, and other actions without needing to build custom HTTP or API logic yourself. To install the MCP plugin, open your n8n dashboard, go to Settings > Community Nodes.
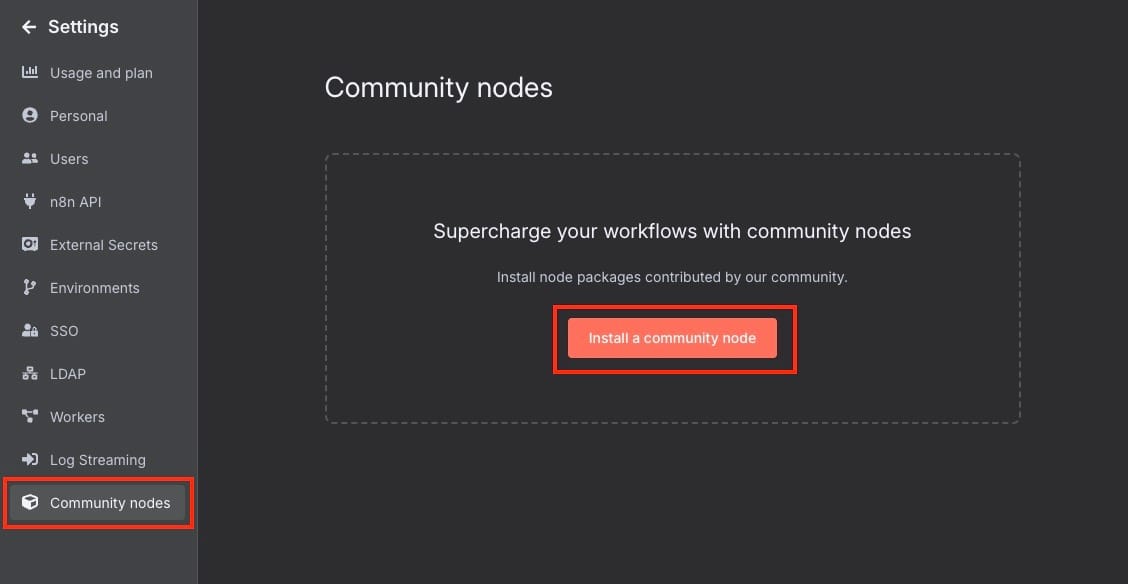
Then install the package:
n8n-nodes-mcp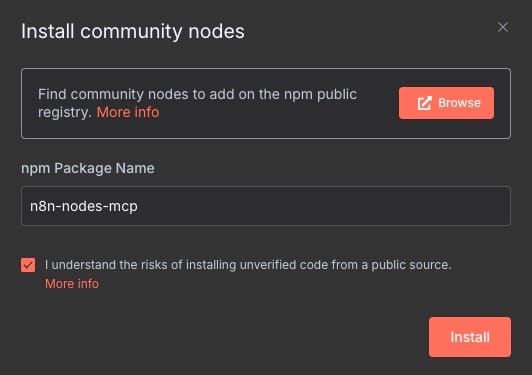
This node unlocks features like listTools, executeTool and integration with external MCP tool servers.
Adding & Connecting to Airbnb’s MCP Server
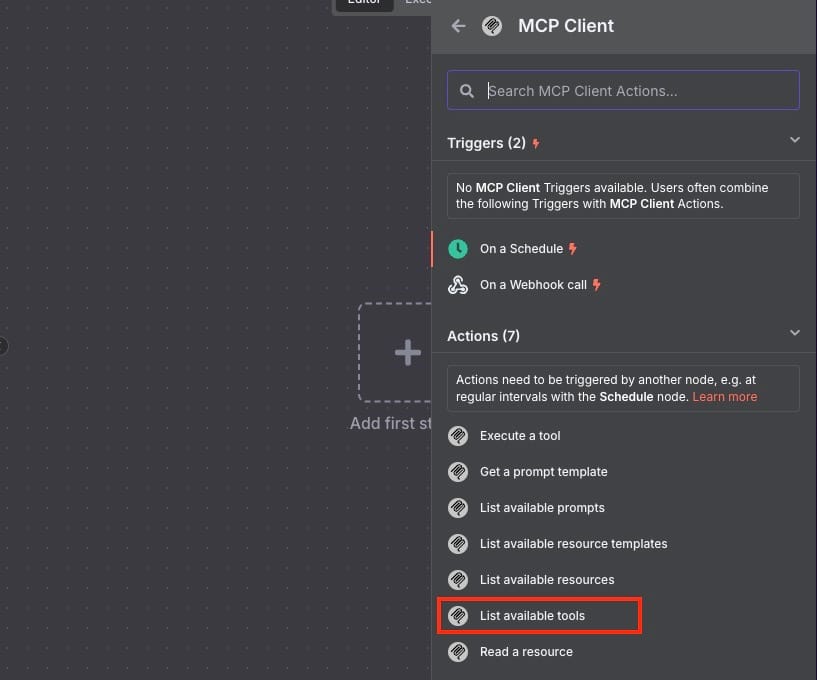
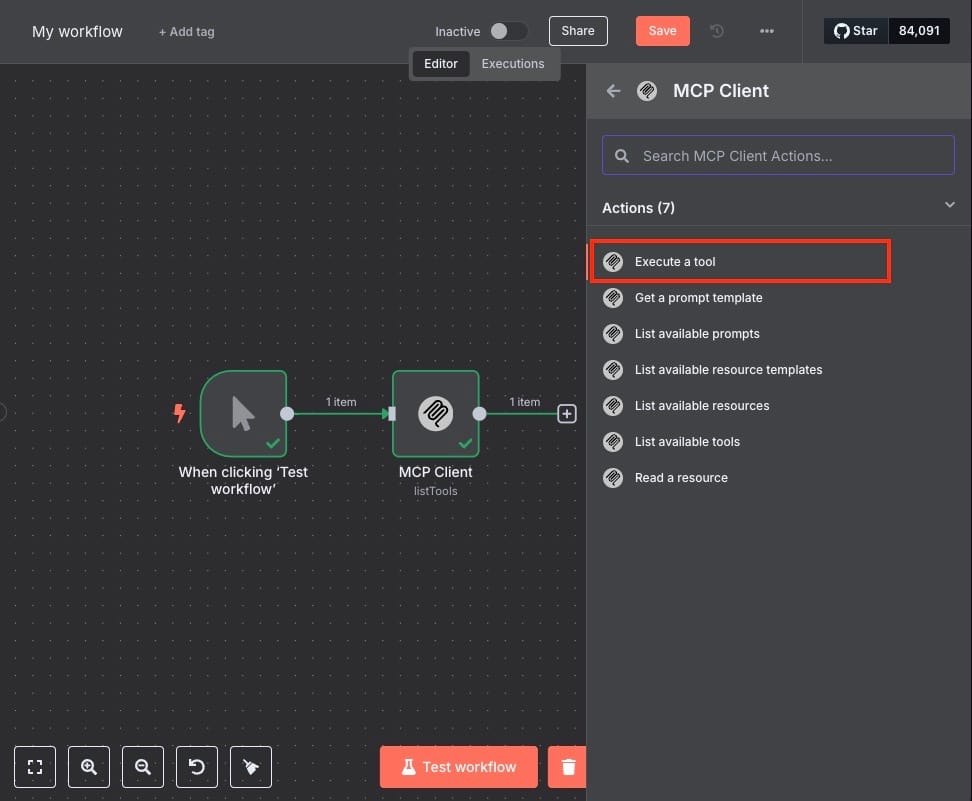
Start by adding the MCP server node in your N8N. Click on the + button on the canvas and search for MCP Client.
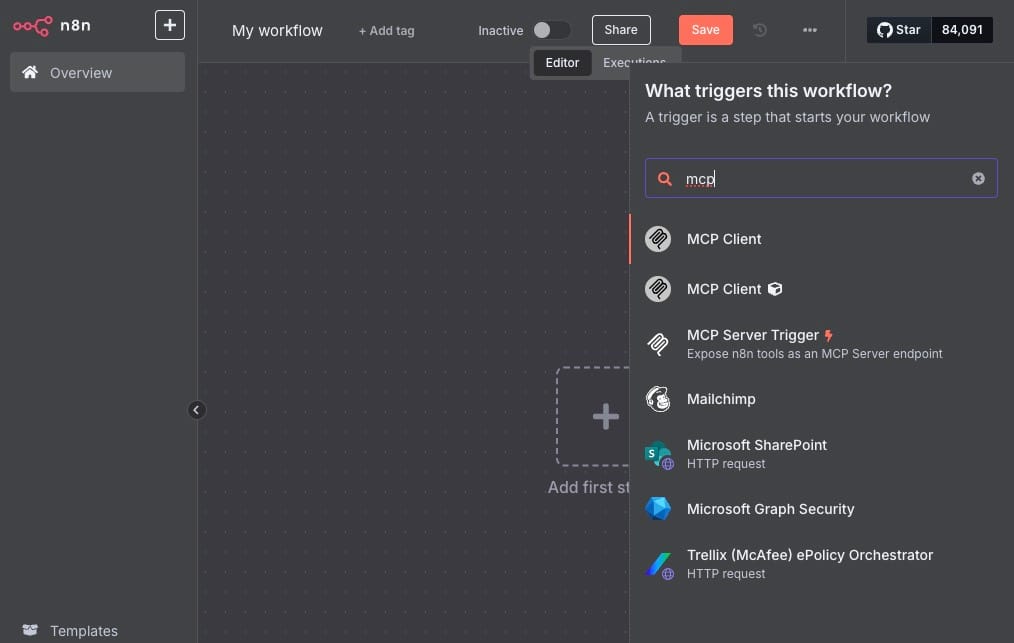
Once selected, choose from the Actions > List available tools
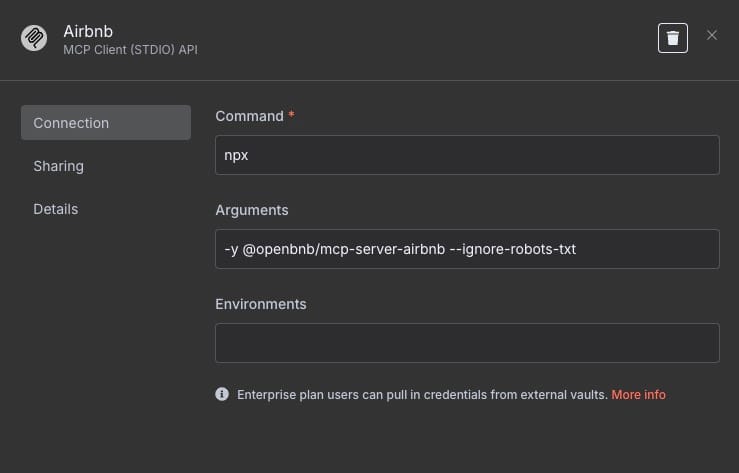
Create a new credential in n8n under Credentials > MCP Client (STDIO) and choose the Command Line (STDIO) method. Use the following configuration:
- Command:
npx- Arguments:
-y @openbnb/mcp-server-airbnb --ignore-robots-txtNo environment variables are required for this server.
Next, add another MCP Client in the chain, but this time, instead of listing the tools, we will execute the tools, do all the above steps again correctly, but this time choose Execute a tool from the actions window.
Inside the configuration for the tool, add the following. You can drag and drop the name and add location to the tool parameters to see the execution.
{
  "location": "los angeles"
}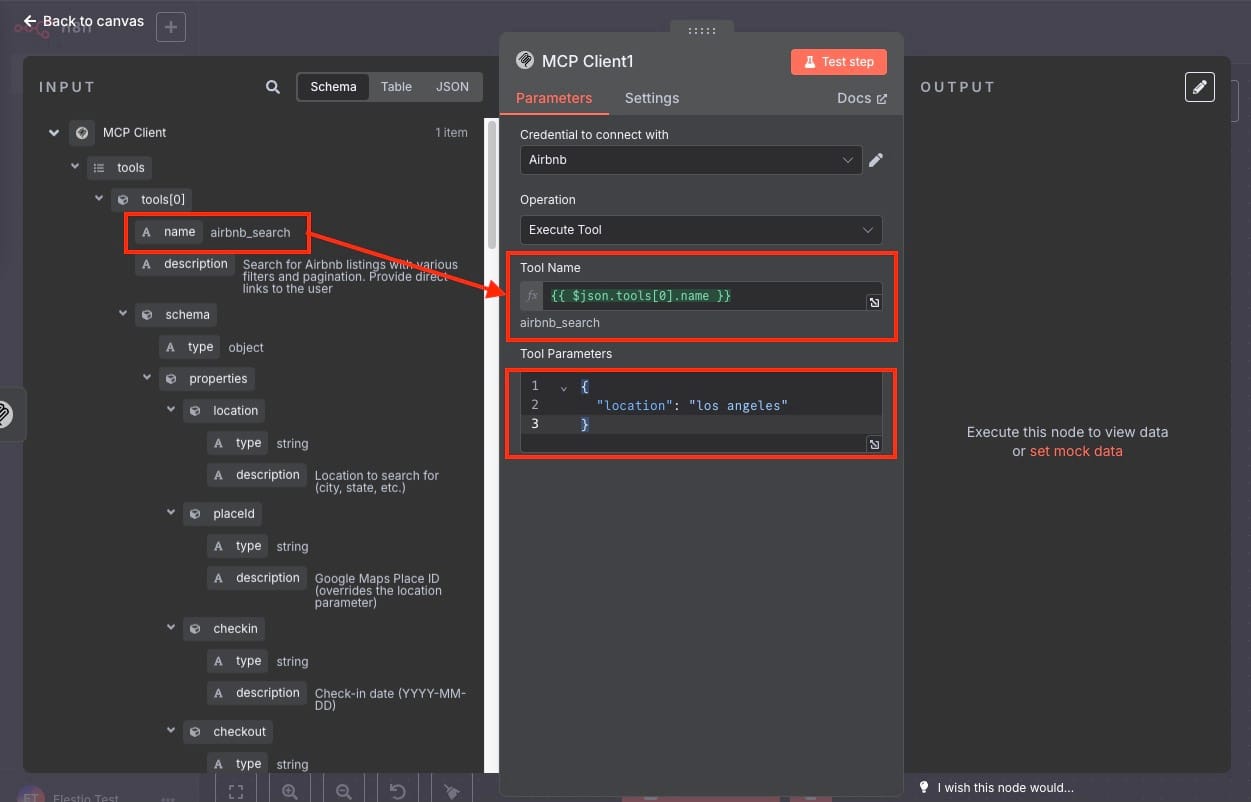
Run the flow and see the locations in Los Angeles searched and shown on the Airbnb website. Now we will use the same methods with our AI Agent.
Designing the Workflow with an AI Agent
Start with a When Chat Message Received node that listens for user input. This input passes to the AI Agent node, which is configured with a chat model such as Groq or OpenAI. Go ahead and add these three nodes and configure the API credits of your AI chat model accordingly. Check out Elestio blogs if you face difficulty.
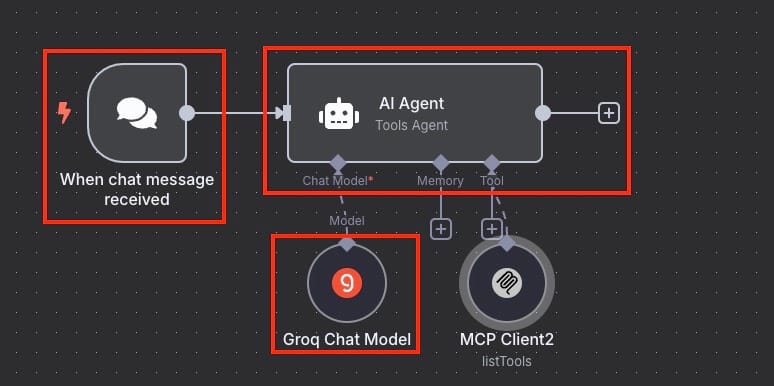
Now that this is done, similar to two nodes in the flow before, we will add two separate MCP nodes to the tooling section of the MCP:
- One MCP node using the
listToolsoperation to fetch all supported tools. This is exactly similar to one we already created before; you can replicate the steps. - Another MCP node using the
executeTooloperation to run the appropriate one based on AI inference.
Listing and Executing Tools Dynamically
The first node, listTools, returns tools such as:
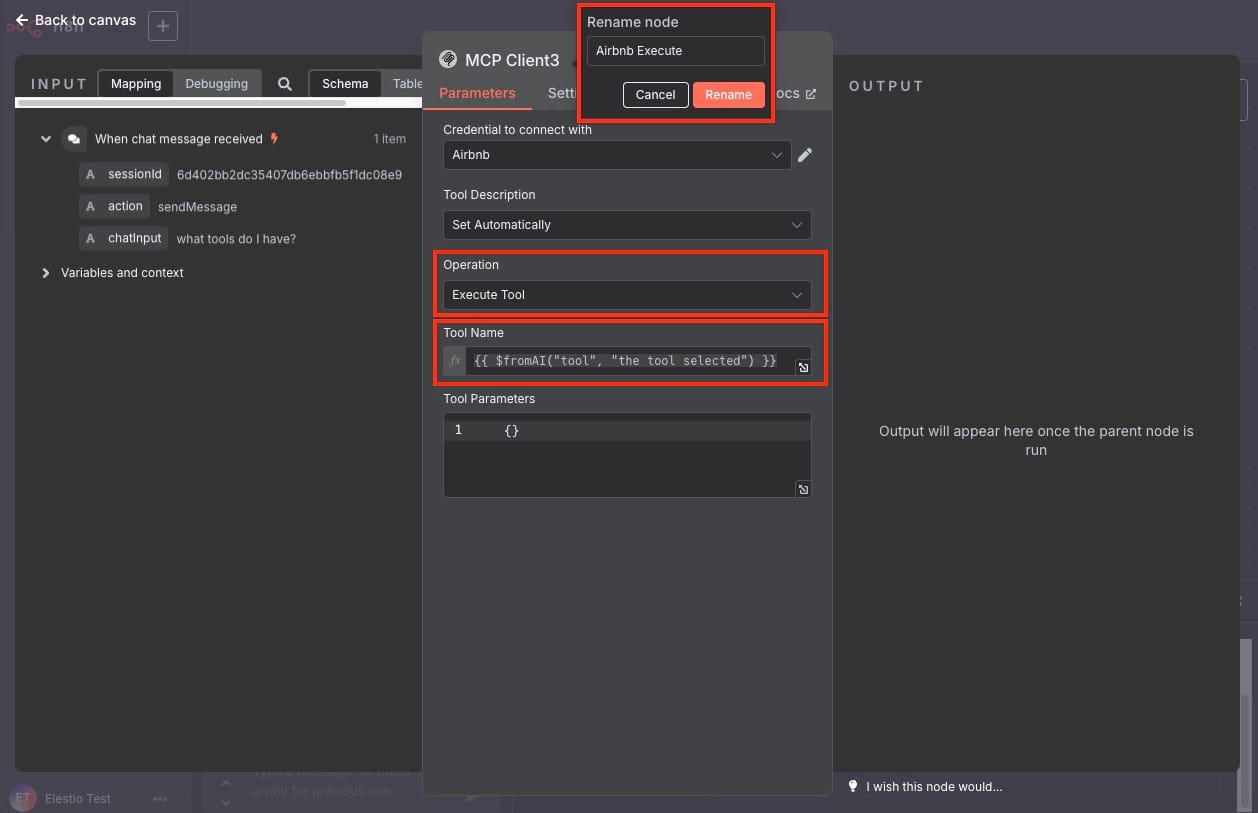
["airbnb_search", "airbnb_listing_details"]Each tool comes with schema information describing required parameters (e.g., location, adults, etc.). The second MCP node is configured to use an AI-generated tool name and parameters:
- Tool Name:
{{ $fromAI("tool", "the_tool_selected") }}- Tool Parameters: Automatically derived from the input message and the selected tool’s schema
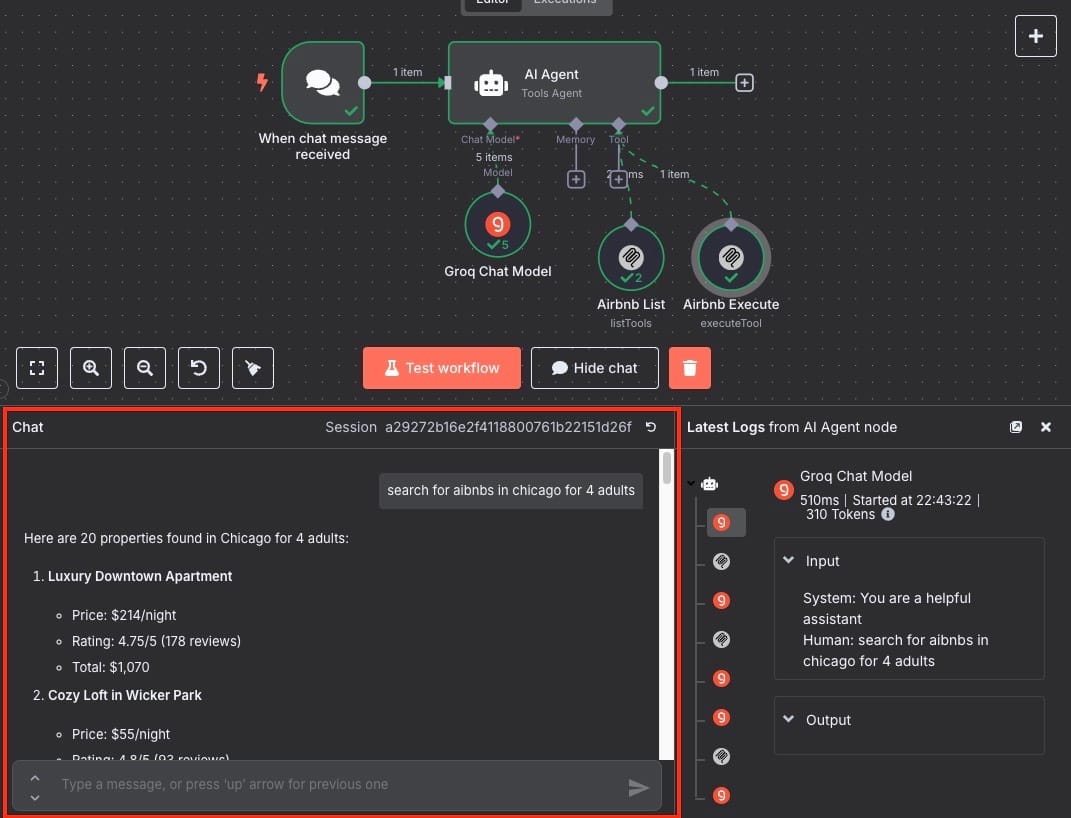
For example, when a user types the following in chat:
Search for Airbnbs in Chicago for 4 adults
The tool selected would be airbnb_search, and the parameters passed would look like:
{
  "location": "chicago",
  "adults": 4
}
The node sends this to the Airbnb server, which responds with listings containing metadata like title, price, rating, and direct links.
Extending the Setup with Brave Search MCP
To connect Brave’s search server, visit the Brave API Dashboard. Create an API key, then go back to n8n and configure a new MCP credential using:
- Command:
npx- Arguments:
-y @modelcontextprotocol/server-brave-search- Environment Variables:
BRAVE_API_KEY=<your_api_key>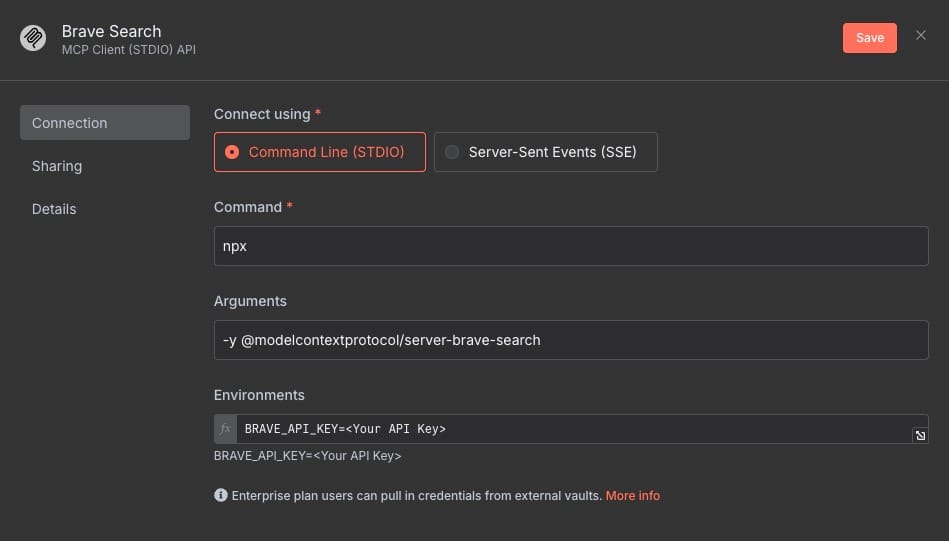
Once set, create another pair of listTools and executeTool nodes inside your AI workflow. When a user asks:
Search the web for AI agent use cases
The AI agent routes the input to the Brave Search MCP client, automatically resolving the correct tool and formatting the parameters. Results include article titles, summaries, and URLS from different sources.
Tool Execution Limitations and Troubleshooting
Tool execution in this architecture depends heavily on first retrieving the tool metadata. If the executeTool node is triggered before a corresponding listTools node has populated available options, errors like the following may occur:
Tool input did not match expected schemaTo prevent this, always call listTools before executeTool. This issue becomes especially visible when working with APIs like Airtable. In that case, the agent must first use listBases to fetch the base ID, then listTables for the table ID, and only then can it call listRecords. Each call builds context for the next. Without memory or persistent context chaining, these steps can break. If needed, values like base_id and table_id can be hardcoded in expressions to simplify execution.
Conclusion
The MCP agent pattern in n8n provides an easy and modular way to connect conversational interfaces to external data sources. With community contributed nodes, you can integrate public tools like Airbnb search or Brave web queries without writing API requests or handling response parsing manually. By using an AI Agent to reason through which tool to use and how to construct parameters, workflows become more intelligent and user-driven.
Thanks for reading ❤️
Thank you so much for reading, and do check out the Elestio resources and Official N8N documentation to learn more about N8N. Click the button below to create your service on Elestio. See you in the next one👋